Concertmate MG-1 VCO Drop Mod
Purpose
This document contains instructions for a modification to the Concertmate MG-1 synth. This mod gives the user to the ability to tune the instrument down beyond its normal range
The MG-1 is a great synth, but I often found myself wishing
it would go lower. With this
modification, my little MG has become a beast of a bass synth – it’s quite
capable of knocking things off the walls...
and that’s a good thing!
Performing this mod requires soldering, and a small (3mm or
so) blade screwdriver. In addition, you
will *have* to re-tune your MG-1.
Make sure you have the necessary equipment before proceeding.
I would recommend having a pretty accurate way to re-tune
the MG-1. I used a guitar tuner, and it
worked pretty well. I also made a short audio recording of the lowest F note
from both VCOs which proved to be handy, so you may want to consider that as
well. If you do this, be sure to turn all modulation off, and
record only the sound of VCO1 and VCO2 (separately).
Background
The VCOs on the MG-1 can be adjusted by way of the FREQ TRIM
and SCALE trimpots. Each VCO has a set,
accessible through the 4 small holes located on the back panel of the MG-1
(behind the TONE SOURCE ONE controls).
When seated in front
of the synth, the holes give you access to the following (from left to right):
VCO2 FREQ TRIM, VCO2 SCALE, VCO 1 SCALE, VCO 1 FREQ TRIM.
While adjustment of these trimpots does allow you to tune
the MG-1 down, on my machine I could only go down about 7 semitones on VCO1,
and slightly less on VCO2. The range of
the trimpots needs to be widened.
Schematics of the areas in question:
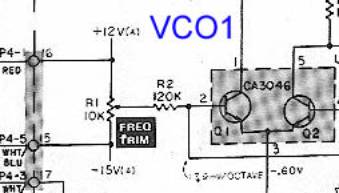

To extend the tuning range of the VCOs, you’ll need to
reduce the value of the resistors which are
in series with the FREQ TRIM
trimpot. You must do this for
each VCO. To adjust VCO1, you will
change the value of R2. For VCO2, you
will change R26. The lower the value of these resistors, the lower you will be
able to tune the respective VCO.
You really don’t want to go too low here, or you’ll have a
very difficult time re-tuning the machine.
As the value of the resistor drops, the FREQ TRIM trimpot becomes more
and more “twiddly.” I suspect if you
reduce the value too much, it will be all but impossible to tune the machine.
For my MG-1, I changed the 120k to 50k, simply because it
was a value that was easily accessible with parts I had on hand. With the 50k resistor, I can tune the VCOs down beyond the useful
range – to the point where I just get clicks and pops. I suspect something in the 70k ohm range
would be more appropriate.
Materials
You will need the following parts:
(2) 50 - 70K ohm resistors
Procedure
* Unplug the synth and open up the case
* Remove the top circuit board – the one with all the panel controls.
* Locate R2. You should find it at the top of the board, close to the VCO trimpots.
- For verification, follow the traces from the resistor. One of them should take
you to the center solder pad of R1 (the VCO1 FREQ TRIM pot).
* Desolder and remove the resistor
* Solder the new resistor in place.
* Repeat for R26, which can be located toward the bottom edge of the board.
- If you trace this out, you’ll see it goes to the center pad on the VCO2 FREQ
TRIM pot (R26).
* Re-assemble the synth, and check it for proper operation.
* Set the front panel TONE SOURCE tuning control to center.
* Using your audio files and tuner, adjust the tuning of the VCOs to the desired
interval.
Tuning and Scaling
When sitting at the synth in playing position, the far left hole (as mentioned above) will give you access to VCO2 tuning, and the far right will be VCO1 tuning. This is where the small screwdriver comes in handy.
You will be able to tune about 2 octaves down if you wish, but that’s about as low as you can go and still get usable tones. Any lower and it begins to turn into clicks and pops as it goes sub audible.
You can also tune both VCOs to the same range, instead of having VCO2 an octave higher. I did that on my machine, and I rather like it
You may find that you need to adjust the scaling as well. To check, play a low note on the keyboard and verify that it is tuned correctly. Then play the same note on the high end of the keyboard. If the tuning on the high note is slightly off, adjust your scaling with the following procedure. You may want to set the MG-1 to “continuous” while you do this.
The SCALE trimmer for VCO2 will be the 2nd hole from the left. For VCO1, you will use the 2nd hole from the right.
- Play a low note on the keyboard, and verify it is properly tuned.
- Play the same note 2 octaves higher.
- Adjust the SCALE trimmer for the VCO you’re working with until the high note is
properly tuned
- Play the original note again, and re-tune it using the FREQ TRIM pot for that
VCO
- Repeat until both low and high notes are properly tuned.
Conclusion
Turn up both oscs, turn down the range switches, adjust the filter, and shake something.... Good times!
Many thanks to Phil Gallo for pointing me in the right direction on this project!
He always has help for me when I want to do something to my MG-1 :)
Other MG owners should check out his site at the address below to see some of the excellent things he’s doing...
http://www.geocities.com/gallomagnetix/
Enjoy!
------------------------------------------------------------------------------------------------------------
DTK 7/06/04
Comments to aurastar@cox.net