August, 2009
May, 2009
March, 2009
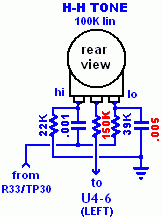
A .001uF capacitor and pot provides a Tone control that allows more of the noise high frequencies to come through.
I've attempted to show schematically how it was wired physically: The
Here is a wiring diagram.
Tom Toms
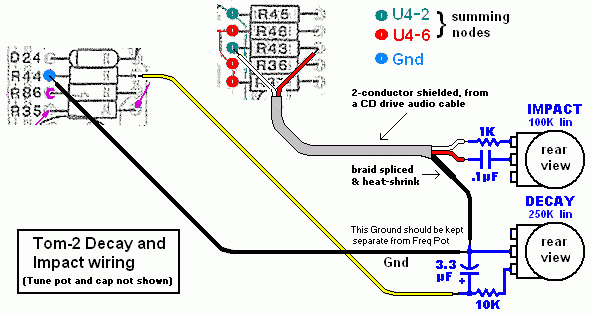
Below is a pictorial representation of how I wired the Tom-2 Impact and Decay mods. Note that although shielding is necessary only at the 1K resistor, using a two-conductor cable makes soldering across R43 more convenient and neater than using a single shielded conductor and a non-shielded wire.
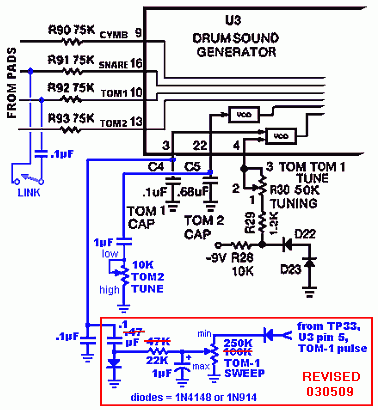
Toms Tuning
To facilitate my planned use of Tom-2 as a Bass, I lowered it's frequency and made it adjustable with a cap and pot in parallel with C5.
Hi-Hat/Cymbal
This mod did not need shielding, just three light-gauge twisted together wires.
(I am still not satisfied with the Cymbal sound, and intend to replace its function with a d.i.y. circuit. Perhaps at some later time I'll attempt to convert the Synsonic Cymbal into some other noise-based instrument.)
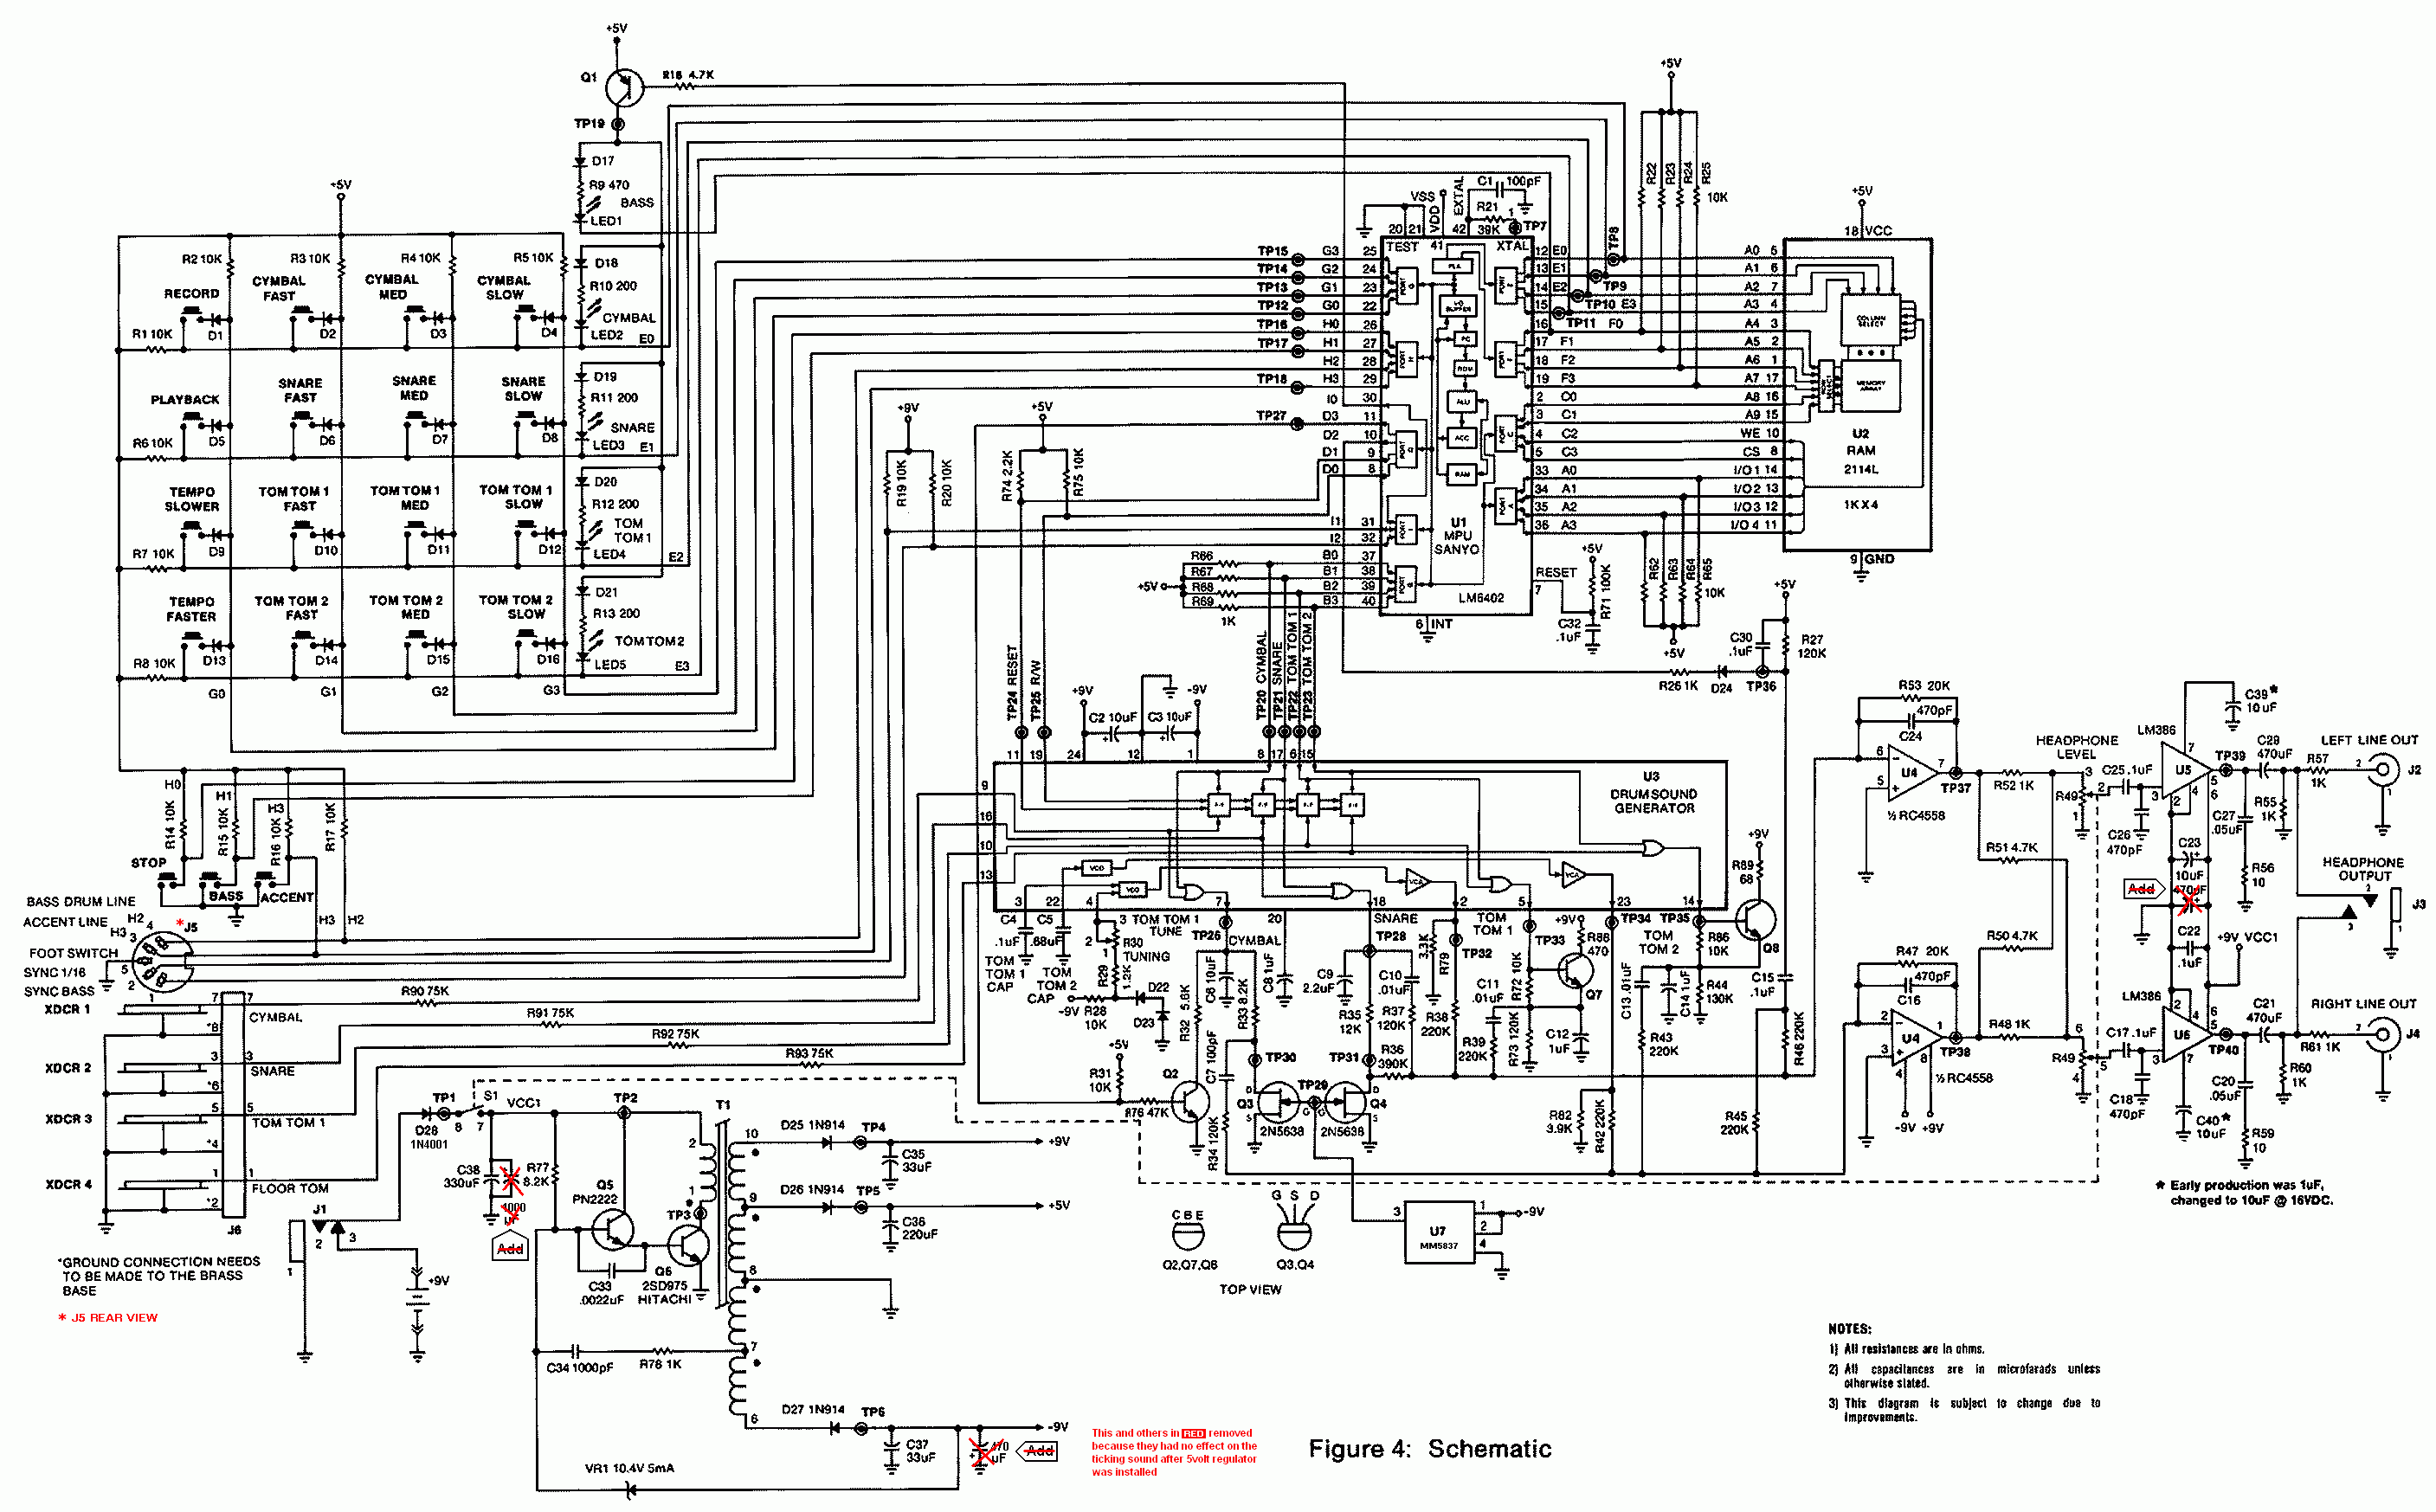
Large Schematic
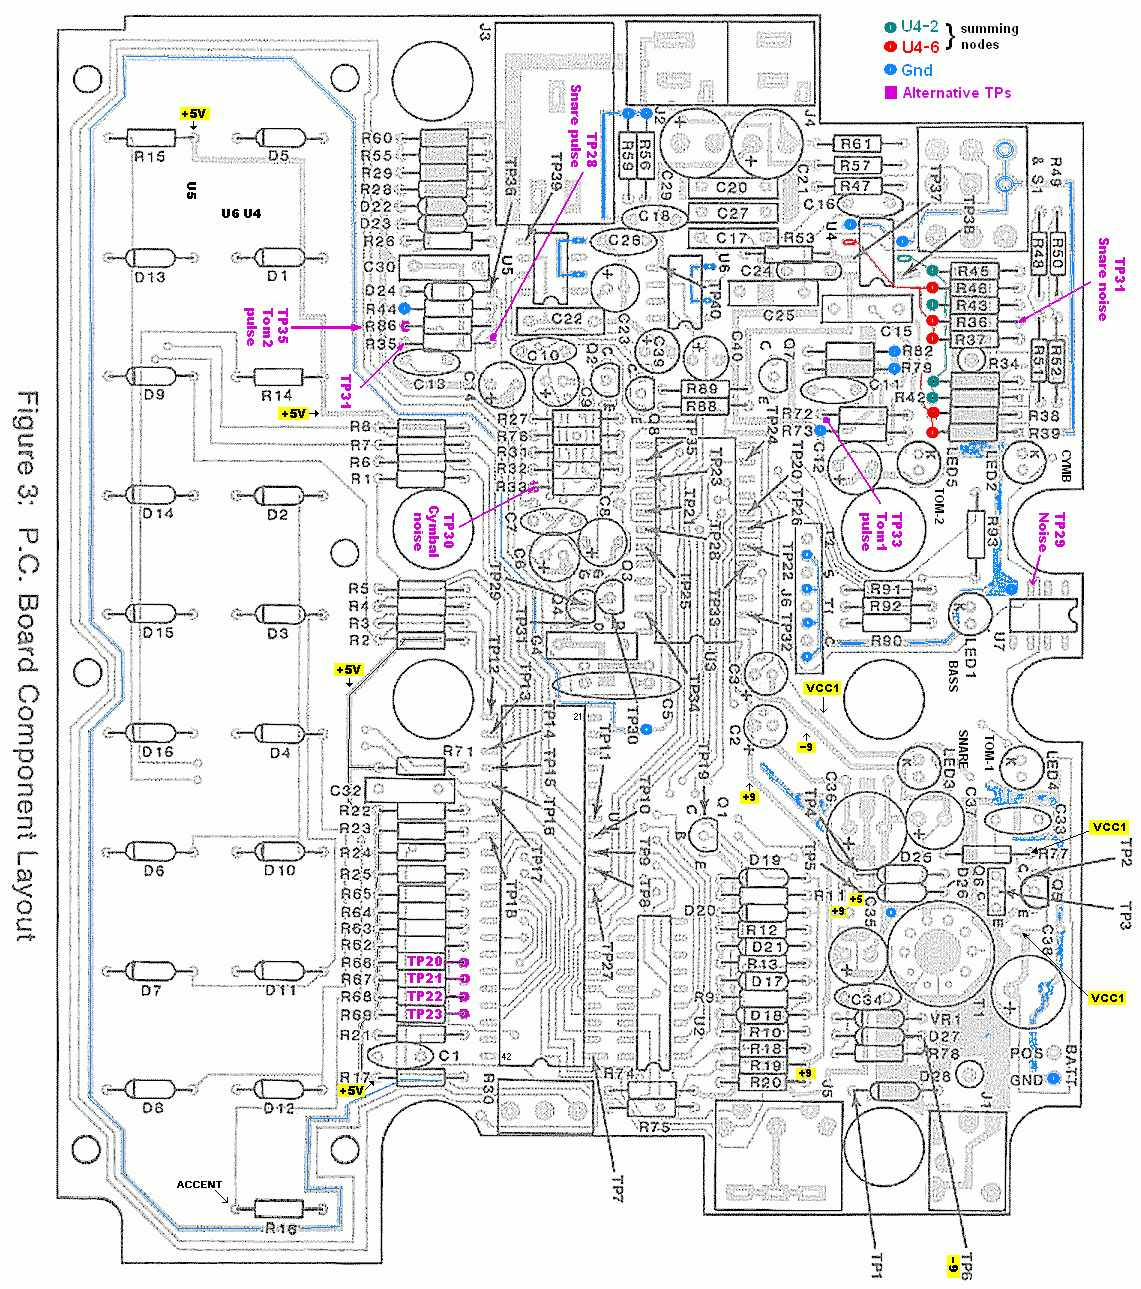
Component Layout Drawing
Sound Samples here
This page and Overview revised
Minor circuit changes
Snare Impact Revised.
Added Speculations on D.I.Y. Hi-hat and Cymbal
Snare and Tom-2 Impact Revised
Tom-1 Sweep Depth Revised
Hi-Hat/Cymbal Tone Revised again 03/25/09
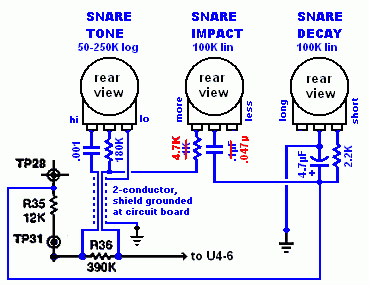
Potentiometer Wiring Diagrams
Large Schematic updated
More signals hi-lighted in Component Layout
Sound Samples
Back to Projects or Publications
Snare
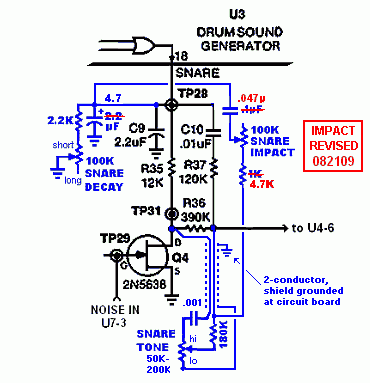 As explained in Overview, Decay is made variable by putting another capacitor plus a potentiometer in parallel with the original cap, C9. Impact is made variable by putting another cap and pot in parallel with the original componets, C10 and R37. The Impact can be varied from the original sound to a hollow thud, a kind of smack, or a thin, crisp click. The control interacts somewhat with Decay and in the right combination with Tone there are sounds that resemble the clickety-click of striking the rim of a Snare.
1k 4.7k and .1uF .047uF are soldered to the Impact potentiometer terminals and TP28 is picked up at the added Decay components. Similarly, a 180k resistor and .001uF cap are soldered to the Tone pot terminals. A two-conductor shielded cable (salvaged from a cable used to connect a CD drive to a PC motherboard,) is used to make the appropriate connections across R36 on the Synsonic board. The shield is grounded nearby and provides ground to the "lo" terminal of the Tone pot. I could've picked up ground at the Decay components, and left the Synsonic end of the shield unconnected. I will probably do it that way when I finalize this thing. I will not be drawing any other schematics this way.
Variable Decay for both Toms is achieved by the same method used for the Snare. Tom-2 has variable Impact, but Tom-1 does not. For some reason, I could not make that work, which is just as well: In my plans, Tom-1 will most often be linked with the Snare to provide a "shell" sound. Since Snare has Impact control, providing one for Tom-1 would be redundant
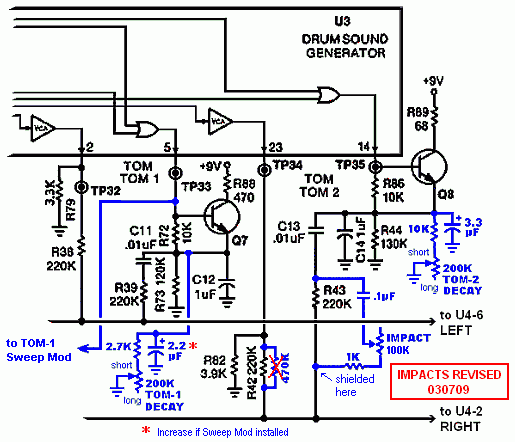
Tom-1 has a built-in, non-adjustable pitch sweep that is too extreme to my ears. To provide control over the depth, I apply a variable amount of the loudness envelope at U3 pin 5 to a diode acting as a Voltage Controlled Resistor to control "how much" of an additional frequency determining capacitor connects to Ground. The result is, as the internal workings of Drum Generator U3 send Tom-1's pitch up then down, the added components can send it down then up, making the sweep less severe, completely canceling it, or reversing it to a downward sweep. (This is another mod wherein most of the components can be soldered to the pot terminals.) You might have to increase the Tom-1 added Decay cap (* in red in the Impact schematic, above,) to maintain the same maximum Decay with this mod. I recommend that TP-33 be obtained at the U3 end of resistor R72, rather than at the IC pin.
Rather than connecting a foot switch to the Jack-That-Looks-Like-MIDI-But-Isn't for shortening the Cymbal decay, simulating a closed Hi-Hat, I thought that applying a voltage from a potentiometer foot pedal to the base of transistor Q2 would give more control over decay than simply long and short. That didn't work as well as I'd hoped, and I could get only three decay rates: long, short and, thanks to the resistor I put in parallel with R32, really short.
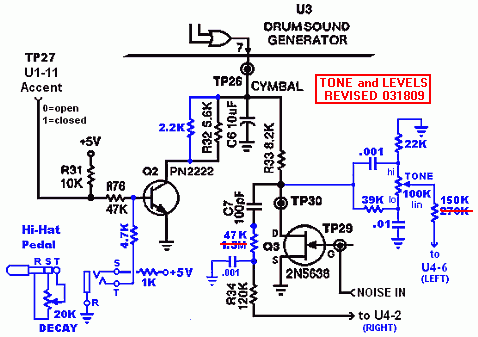 To vary the tone of the Cymbal I added a Bass-Treble boost/cut type tone control. (I got distracted for hours searching for and failing to find the accepted name of this circuit.) The R-C values were determined by trial-and-error. I sent the output from this control to the Left Channel, making the cymbal "stereo." Also, because it seemed to me that the Cymbal was a bit too "penetrating" and drowning out any other instruments that were sounding simultaneously, I reduced the level on the Right Channel by putting a
 1.5Megohm 47k resistor in series with R34. I did this by unsoldering the end of R34 nearest the edge of the Synsonic circuit board, sticking one end of the 1.5Megohm 47k in the resulting hole, and soldering the ends of the two resistors together. At that point I added a .001uF capacitor to ground to provide some low-pass filtering.
 Having the cymbal on both channels, but with different harmonic content, gives it a slight "ambience" but also causes the instruments' locations to be a bit one-sided. This is of little concern to me, since I plan to eventually add other instruments, balancing the placements. Alternatively, R34 can be removed altogether and the output from the Tone pot substituted, keeping the cymbal on the right channel only.
Too much attenuation. Values changed 03/19/09.
Cleaned up a little more, removed the caps that had no effect on the ticking sound after my drastic action of adding a 5 volt regulator. (Yes, the ticking is still present and it's really got me ticked off.)
I've hi-lighted a few more signals, mostly Ground and supply voltages.